How to Tape an Ankle Sprain: A Step-by-Step Guide
Ankle sprains are one of the most common injuries, particularly for athletes and active individuals. Proper care, including taping, can help manage swelling, provide support, and promote healing. If you’re looking for a way to tape an ankle sprain, our step-by-step guide will help you achieve the best results for your recovery.
What is an Ankle Sprain?
An ankle sprain occurs when the ligaments in the ankle stretch beyond their normal range, causing pain, swelling, and sometimes bruising. While most sprains are mild and can be managed with rest and ice, more severe sprains may require additional support, such as ankle taping.
Benefits of Taping an Ankle Sprain
Taping provides numerous benefits for those recovering from an ankle sprain:
- Reduces Swelling: By providing compression, tape can help control swelling.
- Increases Stability: Taping stabilizes the ankle joint, limiting excessive movement that could cause further injury.
- Prevents Re-Injury: Tape acts as an additional layer of support, reducing the risk of reinjury during physical activity.
- Enhances Healing: Properly taped ankles can assist with healing by promoting better alignment and rest for the injured ligaments.
How to Tape an Ankle Sprain: Quick Guide
Taping an ankle sprain helps support the joint, reduce swelling, and prevent further injury. Follow these simple steps for effective taping:
Step-by-Step Guide:
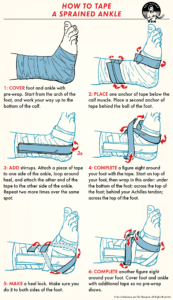
Cover Foot and Ankle
Begin by cleaning and drying the ankle. If no pre-wrap is used, apply a few layers of athletic tape directly over the foot and ankle.Place Anchors with Tape
Wrap a strip of tape around the lower leg just above the ankle. This will anchor the tape in place.Add Stirrup
Apply a strip of tape from the inside of the ankle, across the bottom of the foot, and to the outside. Repeat on the opposite side for added support.Figure 8 with Tape
Create a “figure 8” by looping the tape around the ankle, crossing over the foot to enhance lateral stability.Heel Lock
Apply a tape strip around the heel, pulling slightly to secure the ankle in place and limit motion.Another Figure 8 and Cover
Finish with another figure 8 around the ankle and cover any exposed tape to secure it in place.
Tips for Effective Taping:
- Use High-Quality Tape: Choose a professional-grade athletic tape to ensure durability and comfort during physical activity.
- Avoid Over-Tightening: Too much pressure can cause restricted blood flow. If the foot turns blue or feels numb, loosen the tape immediately.
- Consult a Professional: If you’re unsure how to tape your ankle or if your injury is severe, seek professional help from a podiatrist or physiotherapist.
When Should You Tape an Ankle Sprain?
Taping is generally beneficial in the following situations:
- During Recovery: Taping can be especially useful in the initial stages of recovery, when you’re still experiencing pain and swelling.
- Before Physical Activity: If you’re returning to sports or other physical activities before the ankle is fully healed, taping provides added protection.
- Preventing Re-Injury: Individuals prone to ankle sprains may benefit from preventative taping during high-risk activities.
Contact Us for Professional Podiatry Care
If you need assistance with ankle sprains or other injuries, our podiatric experts are here to help. Call Leading Health Podiatry today to schedule your consultation.